After hunting a deer, it’s time to prepare it for butchering. To start, hang the deer upside down on a large, stable beam or meat pole. Use a gambrel to control the deer’s movement while skinning. Next, prepare the deer’s hide by making field dressing cuts that expose the open cavity. Use a sharp knife to remove the hide in one piece.
Disposing of deer entrails
After you skin a deer, you will need to dispose of its entrails. You can simply leave the entrails out for local wildlife to consume, but if you live near human settlements, you may be required to dispose of these parts properly. While it will be difficult to carry the dead deer to your vehicle, you can field dress the deer.
In addition to field dressing the deer, you’ll want to dispose of its carcass properly. Use disposable gloves and a tarp or plastic sheet to prevent direct contact with the soil and spread of disease. Disposing of the deer viscera is simple: place the entrails in non-porous garbage bags. If you choose not to dispose of the deer remains, you can bury them at least two feet below the natural surface of the ground.
When field dressing a deer, you should remove the head and medial retropharyngeal lymph nodes to test for chronic wasting disease (CWD). You can then place the remaining body parts in a plastic bag and take them to the municipal landfill. Make sure to follow all state and local laws regarding disposal of deer carcasses. If you are concerned about the possible transmission of CWD, you may want to consider having the deer skinned and processed.
Once you have skinned the animal, you can start dissecting the entrails and organs. Make sure to avoid cutting through the spine or brain tissue. After that, remove the meat quarters and place them in a plastic bag. Once you have dissipated the entrails and organs, it’s time to bury the carcass in accordance with local regulations.
The proper disposal of deer entrails is essential to the health of the deer population. The Centers for Disease Control and Prevention recommend against eating meat from infected deer. Hunting deer is a wildlife management tool, and the direct and indirect benefits to the state’s economy are significant. To fight the spread of CWD, hunters must be aware of the proper way to dispose of their dead deer carcasses.
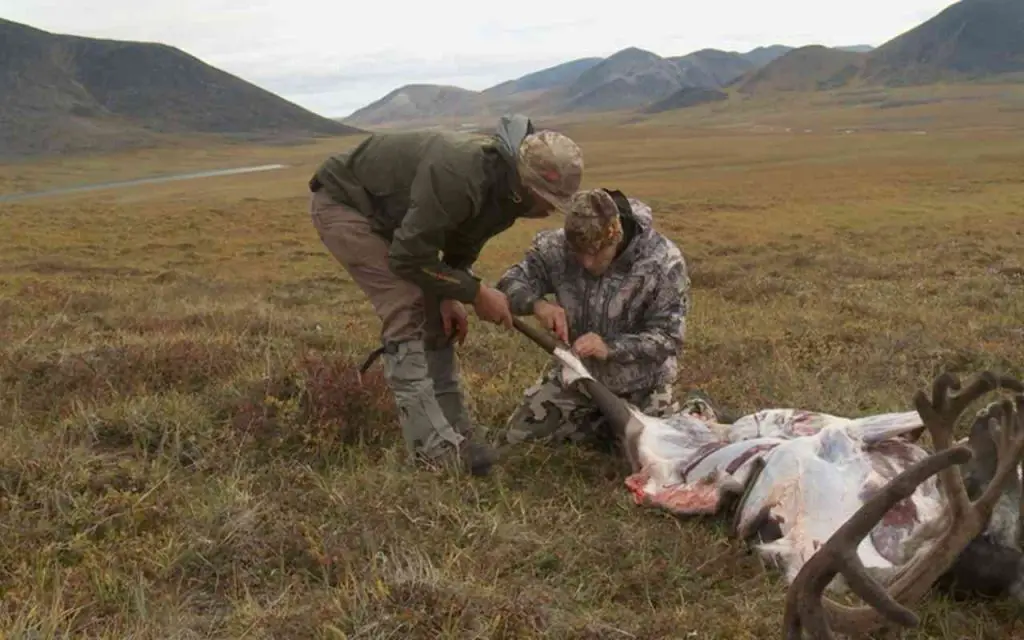
Cleaning a deer’s abdomen
First, prepare the deer for dissection. It is best to face the deer’s head downhill to allow the stomach and intestines to shift. Next, make a circular incision around the rectum, following the wall of the abdomen. Break through the connective tissue of the rectum and pull out the organs. After the organs are removed, field dress the deer.
Begin by separating the skin from the internal organs of the deer by using the index and middle fingers. Hold the knife parallel to the deer’s body to avoid cutting the actual stomach and intestines. This will keep the task cleaner. After removing the skin, make an incision large enough to insert the middle and index finger under the deer’s stomach.
Clean the deer’s cavity by removing entrails, draining blood, and wiping out any visible dirt, feces, and hair. Once done, rinse the cavity thoroughly in clean water. Make sure that you avoid excess moisture because it can affect the quality and safety of the meat. Additionally, you can prop the cavity open to allow air to circulate throughout the body.
When cleaning a deer’s abdomen, you must begin by cleaning the abdominal organs. Next, you should clean the intestines, genitals, and bladder. After that, you should proceed to the heart, lungs, and esophagus. It is important to remove these organs, because they may contain potentially harmful bacteria. You may even have to cut away some of the skin around the anus.
Once you have gathered the deer’s parts, the process can begin. First, you should roll the deer uphill and remove the blood. Use the deer’s antlers and front legs to lift the deer off the ground. By doing this, you can allow the blood to drain out of the cavity and rectal incision, keeping the deer carcass cleaner for further processing and keeping the blood from your vehicle.
Once the anus is removed, the stomach can be opened. It may still be tainted by the broadhead. Make sure to keep this in mind when field dressing. Also, keep the knife clean and avoid puncturing the colon, which can taint the meat. Once the abdomen is clean, you can begin cutting away the internal organs. Make sure to avoid the spinal cord, brain, and lymph nodes, which can cause food-borne illnesses.
Preparing a deer for butchering
The first step in butchering a deer is to separate its organs. The lungs and heart are inside the diaphragm, which can be easily removed using a small knife. Next, separate the deer’s neck and esophagus, which are both good for making sausage or cubing for stew meat. Once the organs are removed, skin the deer. The hams are located around the back hips and above the joint where the hooves were removed. These parts are good for stewing and steaks.
After skinning the deer, it should be rinsed thoroughly. Rinsing removes excess hair and helps to cool the meat. Whether the meat is being processed at home or professionally, it is crucial to remove all hair and dirt from the animal before butchering it. It is also recommended to age the deer for several days or weeks before butchering it. To prevent it from spoiling, remove any excess fat or other unwanted elements.
Once the skin is free, it is time to cut the head. The head is located near the tail bone, so it is best to cut it off first. Once the head is removed, it is time to remove the hide. It is best to hang the deer on a sturdy pole, tree limb, or beam so that it does not fall. Next, prepare the body and hide for butchering.
The meat can be aged for up to two weeks. The length of aging depends on your preferences. Aged meat is tastier if it has been left out to age. A few days or a week should do the trick. To preserve the quality of the meat, store it at a temperature between 34 and 40 degrees. After the deer is killed, split the hide from the rear and use a bone saw to cut the upper chest cavity and tailbone. After splitting the hide, remove all dirt, insects, and debris from the animal’s skin.
Skinning a deer
Ideally, skinning a deer involves no more than a few steps. First, peel back the skin on the leg to reveal the knee joint and two leg joints. Pull the skin downward using the legs as leverage. For stubborn skin, use a knife. Next, skin the deer from head to tail. If the skin is not easily removed, the deer should be stuffed. It’s usually best to skin it as soon as possible after removing it from the leg.
To start, separate the hide from the meat. Cut along the muscle and connective tissues. If the deer is mounted, it is easier to peel the hide off. Cut the fur along the lower leg’s ridgeline with the blade of the knife. Make sure not to cut the achilles tendon. Turn the hide over and pull the remaining skin away from the leg. Continue the process until the deer is completely skinned.
Before you begin skinning a deer, you must prepare the skin and hide by preparing the animal properly. Most people hang their deer on a gambrel or large tree limb to keep it stable. To hang the deer, you need to make a slit in the back of the hind leg’s strong tendon. A pole can be inserted through this slit to hang the deer.
Once the deer is dressed, skinning it can be a challenging and rewarding process. You can either take the carcass to a butcher or hang it yourself. But if you’re an experienced hunter, you’ll appreciate the experience of skinning the deer yourself. Just remember that the process of skinning a deer takes time, preparation, and skill. The meat will be tender and juicy, and a well-knifed knife will save you from costly trips to the doctor’s.