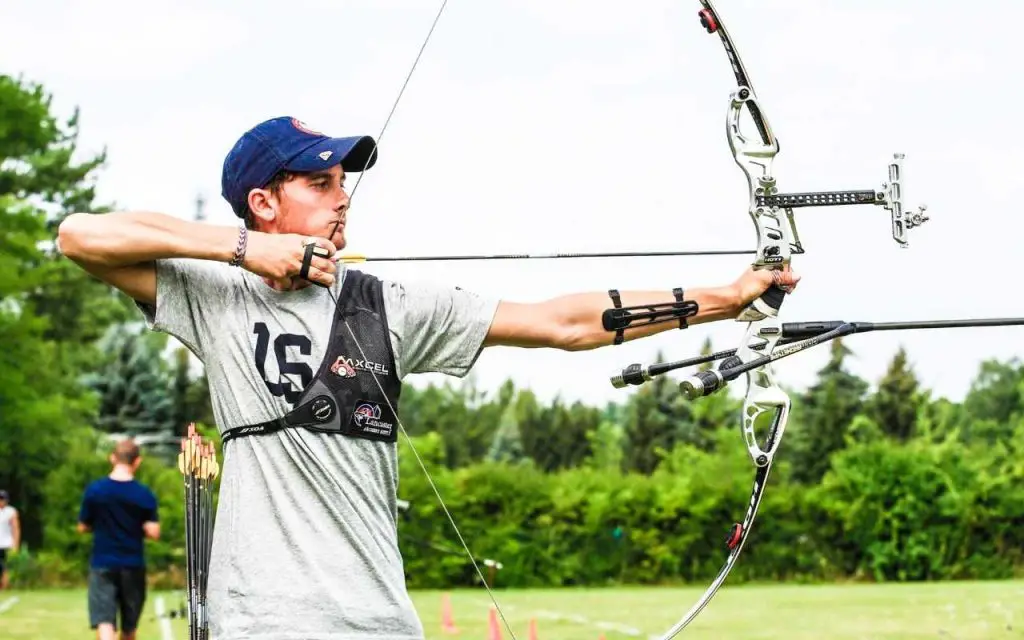
How should your bow arm be held when shooting a shot? Your bow arm should be relaxed and ready to resist any additional back tension. If you find yourself hyperextending your elbow during the draw, consider shortening your draw length. If you still cannot pull your shot off, you may be using too much resistance from your bow arm. Here are some other tips to keep your bow arm relaxed and ready for the release of the arrow.
Avoid raising your shoulders
When holding your bow arm, avoid raising your shoulders. You should have a relaxed and comfortable posture while holding it. This is important for the accuracy of your aim. As you get used to the process of archery, you can now focus on your arrow and your bow sight. When you are a beginner, you should first master the balance of your bow. Keep your body relaxed and focus on your aim. Practicing will help you achieve this.
Properly setting your bow arm is essential in preventing shoulder injuries. When your shoulders are raised, your arm and shoulder joints take more stress, which can cause a variety of issues, including shoulder impingement and chronic injury. Proper bow arm positioning will help you avoid these problems, including shoulder impingement and other injuries. Here are the most important tips for keeping your bow arm level when holding your bow arm.
The first step to improving your shoulder alignment is to strengthen your pectoral muscles. You’ll also need to strengthen your latissimus dorsi and serratus anterior. Core strength is also essential to maintain a low front shoulder and reduce the tendency to arch your back, which forces your shoulder up. When you have high front shoulders, you may feel awkward, and you should change your shot setup. If you do not have a strong back, you may want to try lowering the weight of your bow draw. This will help you develop a natural low-shoulder position and increase your draw weight gradually.
The second step is to practice your shoulder-setting technique. This involves pressing the armpit downward at a 45-degree angle away from your body. When archers practice shoulder-setting, they generally do this while settling into their anchor. This method helps give their shoulders something to do and creates a sense of stillness. This technique is also helpful for improving your arm strength. You should also make sure your elbow joint is properly screwed in when you are holding your bow arm.
Avoid forming a T shape
Having trouble with your bow hand? Don’t panic. The problem isn’t with your grip; it’s in how you hold your bow. Here’s how to avoid forming a T shape. First of all, avoid overstretching your thumb, as this will cause wrist pain. If your thumb is stiff or squashed, it will not allow your bow arm to move properly.
Instead, keep your bow arm straight, aimed at your target. This will prevent any unintentional movements from affecting the flight of your arrow. Another common mistake when drawing a recurve or compound bow is letting it drop too quickly after the release. This causes the arrow to fall below your target. By practicing the proper drawing technique, you will become more consistent and avoid a common bowing mistake.
When drawing your bow back, keep your shoulders square and the elbow of your holding hand equal to the level of your shoulder. While drawing, it is crucial to maintain this stance. This will increase your accuracy and control over your bow. By practicing this method, you will soon develop the perfect drawing style. The key is to remember that your drawing arm should be at the same level as your shoulder or even higher. The same is true for your holding hand.
When drawing your bow arm, always maintain a solid stance, which means your feet are evenly distributed between the two feet. If you’re inexperienced, you can take a picture of yourself and compare the angle of your arm to the arrow’s flight. If you don’t have the proper draw length, then you’re probably too relaxed, and your bow arm isn’t providing enough resistance to your shot.
Avoid moving your elbow joint
While holding your bow arm, make sure that your elbow is oriented backward. Start by leaning against a wall, placing your hand on the wall, and rotating your arm into the proper orientation. After a few seconds, relax your arm and shoulder. The aim is to stretch your tricep muscles. If you don’t want to cause any pain, practice the proper orientation before moving on to more complicated exercises.
To strengthen the muscles, perform a bow arm exercise without a bow. Simply place your arm at shoulder level against a wall. While leaning against the wall, slowly turn your elbow joint until you feel a little pressure. Many archers use this exercise as a warm-up for their bow arm. While doing this, keep practicing screwing your elbow joint in when holding your bow arm. While holding your bow, you should also try practicing this exercise without the bow.
Archery injury is the most common type of elbow injury among archers. Overusing forearm muscles during the draw cycle can cause severe pain. When a person shoots repetitively, the pain worsens. A good remedy for tennis elbow is to rest your arm and take some anti-inflammatory medication. To avoid further damage, reduce your draw weight and use a bow that does not cause hand shock. A slight bend in the elbow joint also alleviates stress on the lateral muscles. A tennis elbow band is another useful accessory that can be worn during the shooting process to stabilize the lateral muscles and prevent shock transmission to the elbow.
In archery, a stable bow arm should be inward-facing. This allows the archer to maintain the proper standing posture and prevent a bad form from causing the arrow to strike the arm. Using a stable bow arm with a fixed elbow joint is an essential biomechanical feature that helps stabilize the shooting technique. This is why it is important to train your bow arm properly. If you are a beginner, make sure to practice this technique in front of a mirror before practicing archery.
Avoid dropping your scapulae on release.
The first thing to keep in mind is that the release phase of the bow is a micro movement. This means that the arc of the upbow will not be in a straight line, but will instead go outward, protracting the shoulder blade. This micro movement will be sufficient to reach the last 1-2mm through the clicker. Once the release phase has been completed, the next important thing to keep in mind is the follow-through. You should control the back tension for about one or two seconds after the release. It should be natural, not forced.
While releasing your arrow, you should also avoid rotating your elbow at full draw. This action can damage the soft tissues in your elbow. This can also cause an improper release, throwing the arrow off target. A proper bow grip will prevent the elbow from hyper-extension, allowing the arrow to be released smoothly. If you are struggling to find the right grip, try gripping a bow with your non-bow hand.
Check your back tension
When shooting with a bow, you must ensure that your back muscles are taut. This can be done by pinching a dollar bill between your shoulder blades and pulling your elbows together. Having back tension prevents your upper body from collapsing. Moreover, relaxed hands and arms are essential for a smooth shot. During shooting, back tension is essential for proper form and proper geometry.
When shooting with a bow, you must remember that your back is the center of alignment for the rest of your body. Maintaining proper back tension helps align your entire body in the T-Form, which will lead to accurate shooting. However, this form has to be learned. A natural way to shoot with a bow is to hold it out with one arm while drawing back with the other arm. Ensure that you are consciously using your back muscles to draw back the bowstring and maintain the proper back tension.
You must have a good grip on the bow. It will make the bow arm straight and stable. Also, the grip of the bow is a crucial aspect, as it directly influences the accuracy of the shot. To achieve a good grip, your knuckles should form a 45-degree angle with the bow. It is also essential to stand up straight while holding the bow. When you feel relaxed, tighten your core muscles to keep your back straight.
To improve your shooting, you must use your back muscles in order to shoot with proper back tension. The main muscles in the back include the rhomboids, latissimus dorsi, trapezius, and teres major/minor. These muscles are necessary to hold your bow at full draw and ensure a good shot. However, some bow hunters may have difficulty maintaining back tension in these areas.